
Google search console login, also called the Google Search Console, will optimize your web content for indexes and ranking to increase traffic for your website. As a part of Google’s Webmaster Tools account , Google search console allows you to manage how your site appears in Google searches.
There are many reasons why you should add Google Search Console to your WordPress site. Let’s look into the benefits of adding Google search console to your wordpress website and how to properly add Google search console to wordpress.
Search Engine Optimization (SEO) isn’t always an easy task. There are a lot of ranking factors to keep track of, and many things you do on your site can inadvertently affect your results. If you want to avoid making mistakes, using Google Search Console + WordPress together can help you get more control over your SEO efforts.
Google Search Console is an excellent, free service that will help you keep tabs on your site’s SEO performance. What’s more, using it alongside WordPress is simple. In fact, we recommend that new websites set up Google Search console as quickly as possible.
What Is Google Search Console?

Google Search Console, formerly known as “Google Webmaster Tools,” is a free service available to all website owners.
It shows you how Google indexes and adds your website to Google search results so that you can make sure the right people are seeing your site.
With Google Search Console, you can:
- Confirm that Google can locate and crawl your WordPress site
- Submit new content for indexing, and add a sitemap
- Analyze your site’s impressions, clicks, and position on Google
- See which search queries (search terms) cause your site to appear in search results
- Delete or hide content from Google so it doesn’t appear in search results
- Find and fix common malware and spam issues
- See which other sites are linking to your site
- Test if your mobile site is driving traffic to your site
In other words, Google Search Console is a helpful tool that gives you information about your site and the people visiting it.
So, are you serious about growing your website?
Then you need to add it to Google Search Console from day one!
That being the case, let’s take a look at how to add Google Search Console to your WordPress website.
Why Add Your WordPress Site to Google Search Console?
Adding your WordPress site to Google Search Console provides you with SEO benefits and gives you advanced tracking features. GSC can help you take your SEO game to the next level by helping you monitor:
- Keywords that are working best
- Posts that are getting more views and clicks
- Searches that users are doing before clicking on your posts
- Ranking and CTR (click-through rate) of each post for different searches
- And more
So if you want to make sure that your content is optimized to bring as much traffic as possible to your site, adding your site to Google Search Console is a must. It comes with plenty of useful features that will help you create new content targeting the right keywords and also update old content for better rankings.
Set up Google Search Console
To set up Google Search Console in Google Analytics, log in to your Google Analytics account and click the Admin tab on the bottom left-hand side.

Under the Property column, click Property Settings.

Next, scroll down to the bottom of the screen and click on the Adjust Search Console button.

On the next screen, click Add.

You will then see a screen that shows all of your websites. Select the one you want to add and click the Save button.
Now you’ll need to verify the website you’ve added to Google Search Console in Google Analytics.
Verify Your Search Console Website
Before you can see you site’s Search Console data, you need to prove to Google that you’re the owner of your website.
To start, go to Google Search Console, sign into your Google Analytics account, and click the red Add a Property button.

Add the exact URL of the website you added to Search Console and click Add.

Under the Recommended method tab, click Verfiy.

You’ll see a success message once the verification goes through.
And that’s it! Your website is now connected to Google Search Console. You can now begin viewing Search Console data.
View Google Search Console Data
To view your Search Console data in your Google Analytics account, go to Acquisition » Search Console.

Here you can check data related to:
- Landing Pages
- Countries
- Devices
- Queries
You can also log into your Search Console account here, and see things like:
- How your site appears in Google search results
- Links to your site and internal links
- Your index status
- Crawl errors
- And much more
Lastly, you can use the MonsterInsights plugin to view your Search Console Report right from your WordPress dashboard.
Start by going to Insights » Reports. From there, click on the Search Console tab.

Here you’ll see your website’s top search terms. Next to each term, you’ll see the following:
- Clicks
- Impressions
- Click-Through Rate
- Average Position
This gives you a good idea of the keywords that are bringing people to your website and whether people are finding what they’re looking for once on your site.
It also shows you the position your keywords are ranking for in Google, which is the whole point of focusing on SEO.
And there you have it! An easy way to configure your WordPress website with Google Search Console so you can make sure your site is not only showing up in Google search results, but is showing up in the right places.
If you’re looking for great ways to improve on your overall SEO strategies in an effort to drive even more traffic to your site, check out our post on Google Analytics SEO hacks designed to bring more organic traffic to your site.
And don’t forget to follow us on Twitter and Facebook for more helpful Google Analytics tips.
Bonus: How to Use Yoast to verify your Property
If you have the Yoast SEO plugin installed on your WordPress installation, you can verify the GSC property without using any additional plugins. To do this, go to the Yoast General settings and head to the Webmaster Tools tab. There, you will see an option called Google verification code.
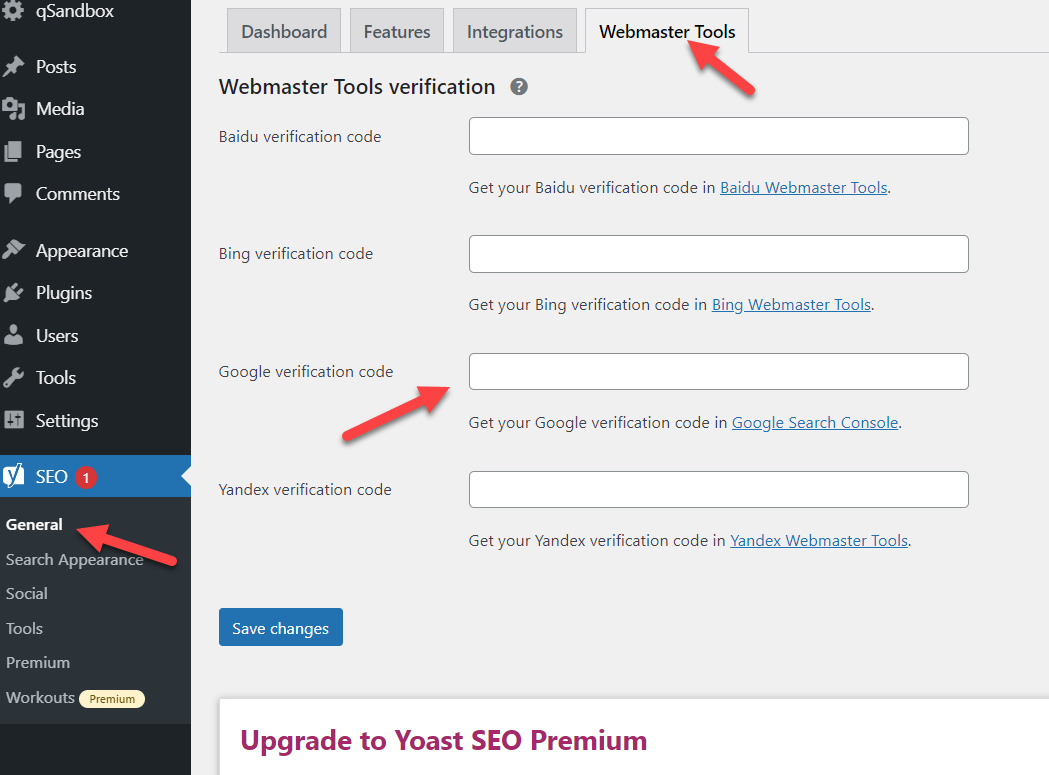
In Google Search Console, start the verification process and select the HTML tag method. You will get a unique code that will look like this:
<meta name="google-site-verification" content="cAcDwpOHZaIXW2Blr4r3NXU1i3xRmSJviZYY9PGpLzY" />
To complete the verification using Yoast, all you need is the verification code, so you can remove the other parts. In this case, the verification code is:
cAcDwpOHZaIXW2Blr4r3NXU1i3xRmSJviZYY9PGpLzY
Now paste the verification code in the Yoast SEO settings and save the changes.

Once you have hit the save button, the code will be added to your header. Finally, go back to the GSC and press Verify to complete the verification process.
This is another simple way to verify the Google Search Console property and it takes less than a minute!
Conclusion:
Have you ever wondered how to use WordPress’s search console? If so, let me explain. Maybe you’ve heard people talking about it and want to understand what it is for and how you can benefit from using it, or maybe you haven’t heard of it before and want to learn more. It’s one of my favourite WordPress features that I like on my websites, so I hope this blog post will help you understand what WordPress’ search console is, how it works on blogs, and why you might want to use it.