
We are living in the world of technology & here you can easily get lot of ways to convert your excel into pdf. It might be employee attendance register or employee salary detail but it doesn’t matter here. You can get multiple methods to convert excel into PDF file format.
We all know that almost every organization maintains data about their business and operations either in the form of documents or in excel sheets. Portability and maintainability is one of the most sought after features when dealing with any type of data.
Save as PDF
This is the most commonly used method and you might have already used this once or twice already.

Save a copy of the file as PDF.
- Go to the File tab.
- Go to the Save a Copy tab.
- Select PDF as the file type.
- Press the Save button.
Easy enough, and your new PDF file will be saved in the same location as the Excel file is saved.

If you want to change the save location or access other advanced PDF file options then you can click on the More options link just below the file type selection.
This will open up a the Save As menu and you can navigate to a new save location as well as access the advanced Options for PDF files.
Export as PDF
I never really noticed this, but there’s an Export option in the File menu.
It turns out, you can use this to export your file as a PDF!

To Export your Excel file as a PDF.
- Go to the File tab.
- Go to the Export tab.
- Select Create PDF/XPS Document.
- Press the Create PDF/XPS button.

This will open up the Publish as PDF or XPS menu, which is exactly like the Save As menu and you can choose the location to publish as well as access advanced PDF Options.
Publish as PDF Quick Access Toolbar Command
You can add the publish as PDF command to the quick access toolbar to avoid the step of going to the File tab.

Right click anywhere on the quick access toolbar and choose Customize Quick Access Toolbar from the menu.

This will open up the Excel Options menu and you can add the Publish as PDF or XPS command from here.
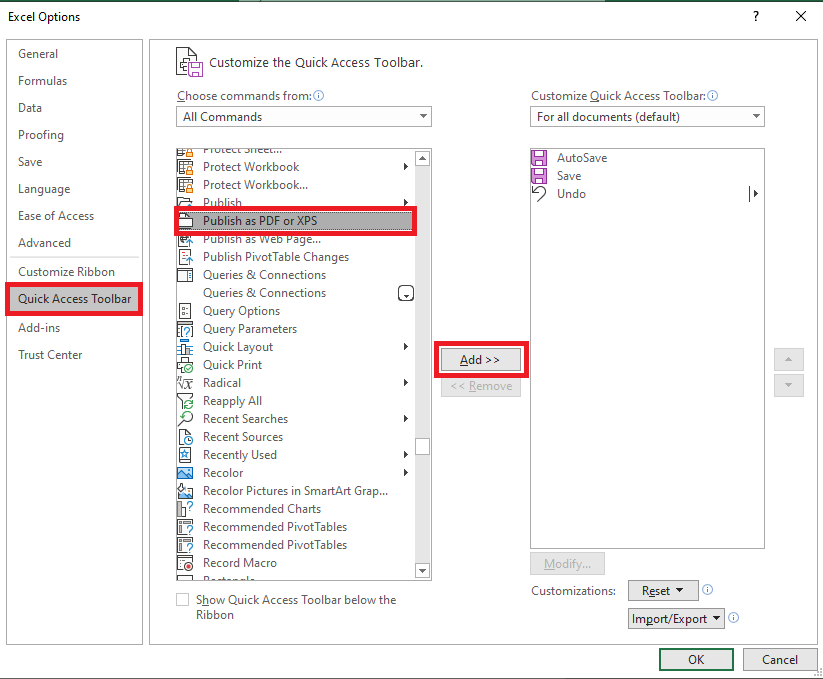
- Make sure you’re on the Quick Access Toolbar tab in the Options menu.
- Select All Commands.
- Scroll down and select Publish as PDF or XPS.
- Press the Add button to add the command into your selection of Quick Access Toolbar commands.
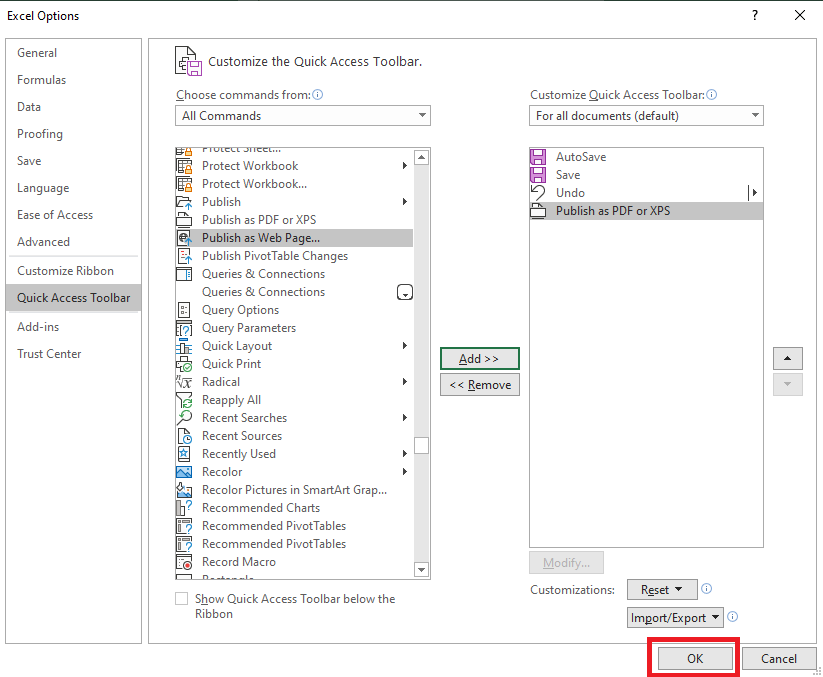
- Press the OK button.

You can now use this command from the Quick Access Toolbar to publish your Excel file as a PDF document.
Email as PDF Attachment Quick Access Toolbar Command
This is one of my favourites on the list as it does two things for you. It will convert your Excel file to PDF and then create a new email message with the PDF attached.
All without any code needed!
This is super useful if you need to email your files as PDF’s.
Again, right click on the quick access toolbar and choose Customize Quick Access Toolbar from the menu.

In the Excel Options menu and you can add the E-mail as PDF Attachment command.
- Make sure you’re on the Quick Access Toolbar tab in the Options menu.
- Select All Commands.
- Scroll down and select E-mail as PDF Attachment.
- Press the Add button to add the command into your selection of Quick Access Toolbar commands.
- Press the OK button.

This will place the E-mail as PDF Attachment command into your quick access toolbar.

When you press this command, it will automatically create a new Outlook email with a subject line of the Excel workbook name. The PDF of the converted Excel file will also be added as an attachment.
This will save you many clicks.
Convert File to PDF in Power Automate
All the previous options to convert your Excel file to PDF are great and they will save you valuable clicks, but they are not automated.
There is a Power Automate action that can convert files to PDF. This means you can convert PDF files as part of some automated process.https://625bd018ef71122a5bcabd59c7f9fe7e.safeframe.googlesyndication.com/safeframe/1-0-38/html/container.html
You could use this to do things like automatically create and send PDF invoices by email at the end of the month.
The file you want to convert will need to be saved in OneDrive.

You’re going to need to add two actions to your automation. The first to convert the file and the second to create the file.
- Add a Convert file action from the OneDrive connector.
- Select the file you want to convert.
- Select PDF as the Target type for the conversion.
- Add a Create file action from the OneDrive connector.
- Select the folder where you want to create the PDF.
- Give your PDF file a name. Make sure to end the name with the .pdf extention.
- Press the dynamic content button and add dynamic content for the File content using the content created from the Convert file OneDrive action.
Alternatively
Convert Excel to PDF
PDFs can be easily shared and can be viewed on any platform without a change in format. So, learning how to convert Excel to PDF is extremely essential!
There are 5 different methods in which you can convert Excel to PDF:
- #1 – Using Save as Option
- #2 – Using Export Option
- #3 – Export using Quick Access Toolbar
- #4 – Email PDF using Quick Access Toolbar
- #5 – Using VBA
Follow the step-by-step tutorial on how to convert Excel to PDF using the Save As option:
STEP 1: Select the Excel table that you want in the PDF Format.

STEP 2: Click on File Tab.

STEP 3: Select Save As > Browse.

STEP 4: In the Save As dialog box, select the location where you want to save the PDF file.

STEP 5: Under Save as type dropdown, select PDF.

STEP 6: Click on the Options button to customize the PDF file you want to create.

STEP 7: In the Options dialog box, Go to Publish what section and click on Selection. Then, Click OK.

This will help you to publish only what you have selected on the sheet. To publish the entire sheet, click on Active Sheet(s), and to publish the workbook click on the Entire Workbook.
STEP 8: Click Save.

This will save you Excel Table in PDF format.

The Export option in Excel will provide you with a quicker way to save your file as PDF.
STEP 1:Go to the File Tab.
STEP 2: Click on Export > Create PDF/XPS Document > Create PDF/XPS Document button.

STEP 3: In the Publish as PDF or XPS dialog box, click on Publish.

#3 – Export using Quick Access Toolbar
If converting Excel to PDF is a regular task for you, you can add it to the Quick Access Toolbar (QAT). Follow the steps below to add Publish as PDF option to the QAT:
STEP 1: Right Click on the QAT to customize it.

STEP 2: In the Excel Options dialog box, select Quick Access Toolbar > Publish as PDF or XPS > Add.
STEP 3: This will add Publish as PDF under Customize Quick Access Toolbar. Now, Click OK.
STEP 4: This will add Publish as PDF/XPS to the Quick Access Toolbar.

STEP 5: Simply click on the icon, select the file location you want to save it at and click on Publish.
#4 – Email PDF using Quick Access Toolbar
If you want to attach an Excel file as PDF in an email, you can add it to the Quick Access Toolbar (QAT).
Follow the steps below to email PDF as QAT:
STEP 1: Right Click on the QAT to customize it.
STEP 2: In the Excel Options dialog box, select Quick Access Toolbar > E-mail as PDF Attachment > Add.

STEP 3: This will add E-mail as PDF Attachment under Customize Quick Access Toolbar. Now, Click OK.

STEP 4: This will add E-mail as PDF Attachment to Quick Access Toolbar.

You can also use VBA code to publish a range in Excel into PDF. This VBA will prompt you to provide the range you wish to export and then select the location, to automatically export Excel to PDF.
Copy Source Code
‘MyExcelOnline.com – PrintSelectionToPDF
Sub PrintSelectionToPDF()‘Declaration of Variables
Dim rng As Range
Dim strFilePath As String
Dim strFile As String
Dim file As Variant‘Check first if a range has been selected
If Selection.Count = 1 Then
Set rng = Application.InputBox(“Please select a range”, “Get Range”, Type:=8)
Else
Set rng = Selection
End If‘Create the filename with the path – the default filename is ExceltoPdf.pdf
strFile = “ExceltoPdf.pdf”
strFile = ThisWorkbook.Path & “\” & strFile‘We open a save prompt for the username to select the location and filename
file = Application.GetSaveAsFilename(InitialFileName:=strFile, FileFilter:=”PDF Files (*.pdf), *.pdf”, Title:=”Select location for the PDF file”)‘Start the export process of the selected range
If file <> “False” Then
rng.ExportAsFixedFormat Type:=xlTypePDF, Filename:=file, Quality:=xlQualityStandard, IncludeDocProperties:=True, IgnorePrintAreas:=False, OpenAfterPublish:=False
MsgBox “PDF file has been successfully created: ” & strFile
Else
MsgBox “Unable to create PDF file”, vbOKOnly, “No File Selected”
End IfEnd Sub
Follow the steps below to use this VBA code to Export selection to PDF:
STEP 1: Press Alt + F11 to open VBA Editor.

STEP 2: Right Click on the sheet name and then select Insert > Module.

STEP 3: Copy-paste the VBA code from above into here.

STEP 4: Press Ctrl + S to save the file and then click No.

STEP 5: In the Save as dialog box, choose Excel macro-enabled workbook from the drop-down list and click the Save button.

STEP 6: Press Alt + F8 to open the Macro dialog box.

STEP 7: Select the Macro PrintSelectionToPDF that is located in All Open Workbooks and click Run.

STEP 8: In the dialog box, type the required range – A1: F8.

STEP 9: Select the location and press Save.

This is how you can convert the range A1: F8 in excel to PDF.

Convert PDF to Excel
PDF does not allow users to make edits on the data so it might be useful to learn how to convert the data from PDF to Excel. If you have a table saved in PDF, you can easily get that imported in Excel and work on it easily.
The two methods for converting PDF to Excel are:

The most simple method to convert PDF to Excel is to copy & paste the data. Let’s look at an example to understand this better.
Follow the steps below for a detailed tutorial on PDF to Excel converter:
STEP 1: Press Ctrl + A and Ctrl + C to select the entire data and copy the data in PDF.

STEP 2: Open the Excel File and simply press Ctrl + V to paste the data in Excel.

Even though, you have got the data in Excel it is not formatted in the way you want. You can use different functions of Excel to format that like Text to Column, Index Formula, OFFSET Formula, etc.
In this example, you need to transpose every 5th row into a single row using OFFSET Formula.
STEP 3: In the blank cell C1, start with the OFFSET formula to transpose the data
=OFFSET($A$1

This will provide Excel with the starting point to extract data from i.e cell A1.
STEP 4: Now, type the second argument the provides Excel with the number of rows, up or down, that you want the top-left cell of the result to refer to.
=OFFSET($A$1,COLUMNS($A1:A1)-1+(ROWS($1:1)-1)*5, Here:
- COLUMNS ($A1: A1) will count the columns in the defined range and it will expand by keeping the first reference frozen ($A1) and the second reference (A1) relative. When you will drag the formula right, the column count will increase.
- Similarly, ROWS ($1:1) will count the rows in the defined range and it will expand by keeping the first reference frozen ($1) and the second reference (1) relative. When you will drag the formula down, the row count will increase.
- Moreover, we are multiplying (ROWS($1:1)-1) with 5 because we want to transpose every 5 rows from 1 column to multiple columns.
- Lastly, say if we want to transpose data from cell A1 to C1. We need to subtract 1 from both COLUMNS and ROWS function Excel to say in the same row and column from the starting point i.e. A1.
STEP 5: Type the third argument the provides Excel with the number of columns, to the left or right, that you want the top-left cell of the result to refer to.
Since the entire data is in the same column i.e. Column A, the third argument will be 0.
=OFFSET($A$1,COLUMNS($A1:A1)-1+(ROWS($1:1)-1)*5,0)
STEP 6: Drag this formula right till Column G.

STEP 7: Again, drag down till row 46 to incorporate the entire table.

STEP 8: Change the Date & Currency format, make the header bold and insert borders.
Your Data Table is ready!

Let’s look at how Excel retrieves a value using this formula in a particular cell (say E4).
=OFFSET($A$1,COLUMNS($A4:C4)-1+(ROWS($1:4)-1)*5,0)
=OFFSET($A$1, 4-1+(ROWS($1:4)-1)*5,0)
=OFFSET($A$1, 3+(4-1)*5,0
=OFFSET($A$1,18,0)
=John Michaloudis

#2 – Import Data from PDF to Excel
In most cases, you will be able to simply copy & paste the data and format it to get the desired result. But if that is not working for you, use the Import Data method in Excel.
Follow the steps below to import data from PDF to Excel (For Excel 365 only):
STEP 1: Go to Data Tab > Get Data > From File > From PDF.

STEP 2: In the Import Data dialog box, select the location of the PDF file, and click on Import.

STEP 3: In the dialog box, select the table from the left panel and click on Load.

This will convert the table from PDF to Excel!

Conclusion
The Microsoft office is one of the best all in one package that comes with an impressive set of features for any user. One of the most popular feature of this office are the excel spreadsheets. These are known to be very popular when it comes to recipe making, project planning or arranging important data in a professional manner. But one of the major issues when it comes to the excel is that these are present in a very large size when it comes to their file size. Therefore in order to manage this issue there have been many applications that have come up which can convert excel into pdf format in order to work with them.